


How to Photograph Electronic Products & Digital Devices
That smartphone in your hands contains glass, brushed aluminum, glossy plastic, chrome accents, and a high-resolution display. When Apple launches a new iPhone, every curve, reflection, and surface finish has been precisely engineered. Your photography needs to honor that precision while making people want to buy the thing. Miss that balance, and you'll lose clients to photographers who understand the difference.

Types of Electronics Photography: Find Your Focus
Before diving into technical execution, it's worth understanding the distinct approaches that define electronics photography. Each type serves different objectives and requires specialized skills, though the fundamental challenges of managing reflective surfaces and maintaining technical precision apply across all categories.
Product Photography for Electronic Gadgets
Traditional electronics catalog product photography focuses on a clear, accurate representation of devices against clean backgrounds. This approach dominates ecommerce platforms, product catalogs, and technical documentation, where the primary goal is to show exactly what customers will receive.
The lighting tends toward even, controlled illumination that reveals all product details. Color accuracy becomes paramount, and consistency across product variations is essential. This type requires mastery of the technical fundamentals.


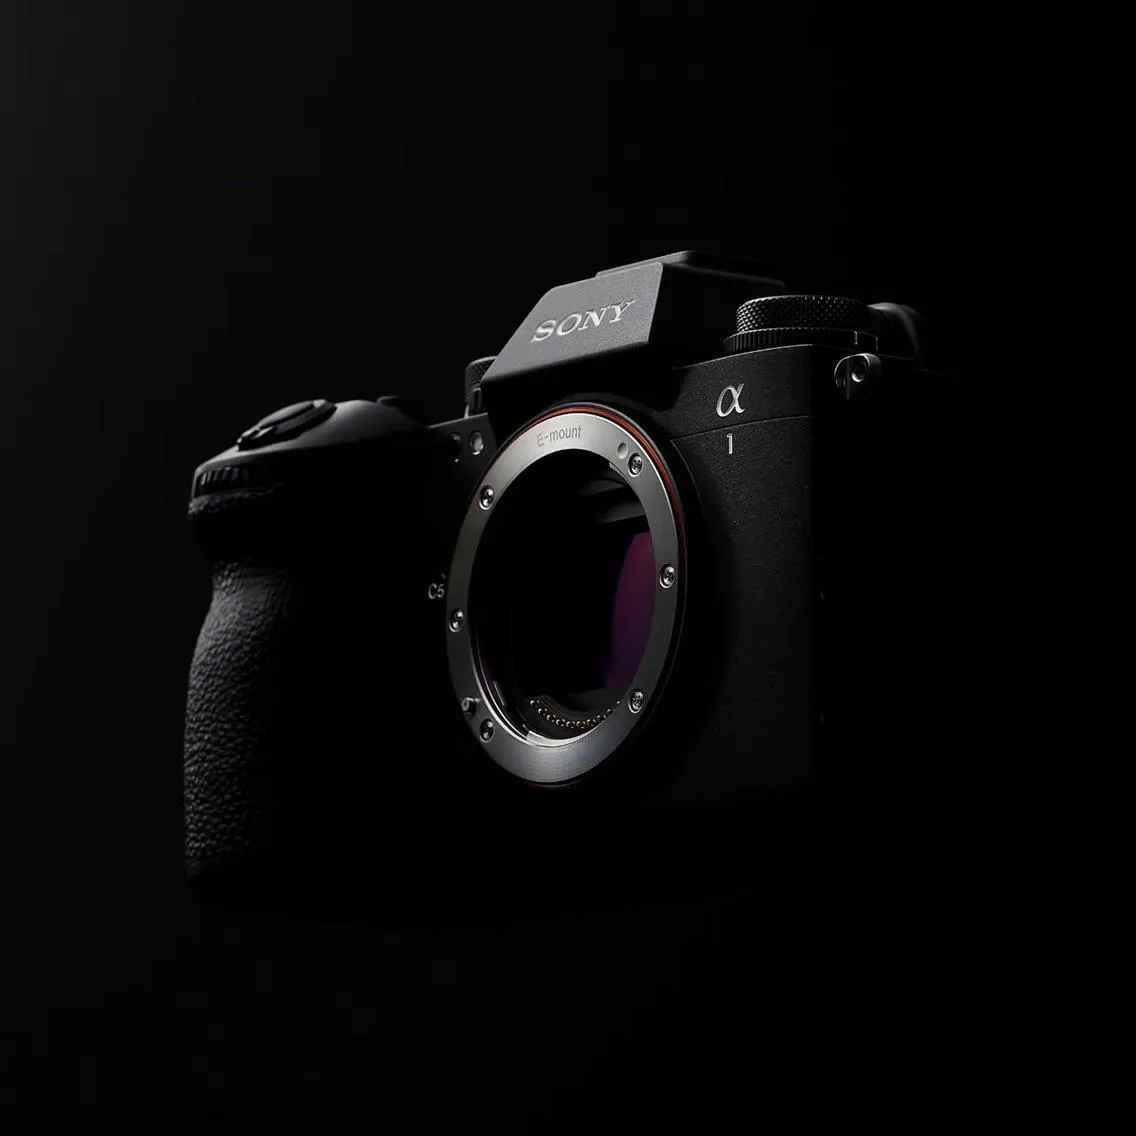
Creative Product Photography of Devices
Creative electronics photography maintains technical accuracy while introducing artistic elements that enhance emotional appeal. This might involve non-conventional lighting, interesting compositions, or environmental elements and props that suggest use context without showing actual users.
The core task is to balance creative vision with precision requirements. Dramatic shadows might enhance visual appeal, but they can't obscure functional details that customers need to evaluate. Creative electronics photography often requires more advanced post-production work to achieve results that are both artistically compelling and technically informative.


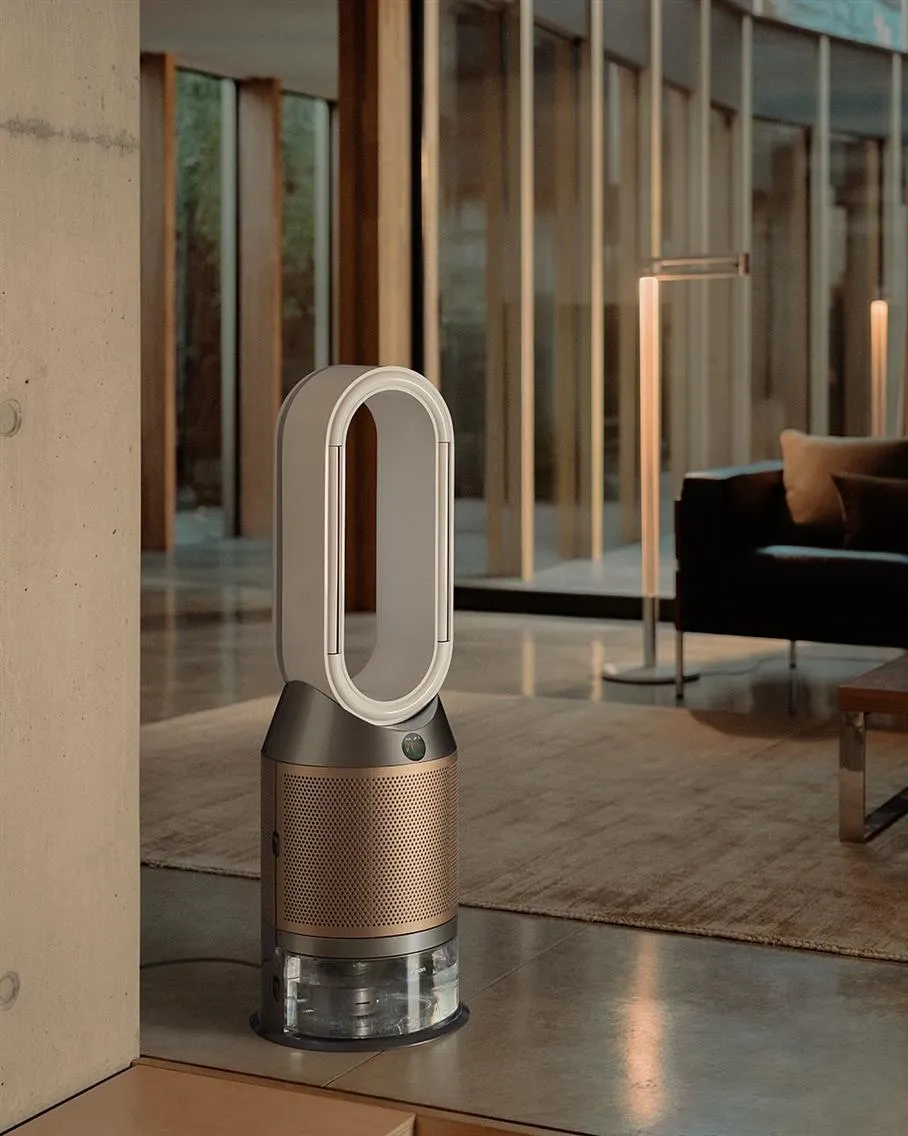
Lifestyle Photography: Context and Aspiration
Lifestyle electronics photography shows devices in realistic use environments featuring models or suggesting human interaction. This approach dominates advertising campaigns and social media content where the goal is to communicate how products fit into customers' lives.
Commercial photographers often build reputations within specific niches. Product photography offers a steady workflow and technical mastery development. Creative work provides higher margins but requires broader skill sets. Lifestyle photography opens doors to larger advertising budgets but demands capabilities beyond pure product photography expertise.


The Hidden Challenges of Electronic Product Photography
Precision manufacturing creates precision expectations. Electronics brands invest millions in industrial design details that must translate perfectly in photography. A slightly curved edge on a watch case might suggest poor quality. Soft focus on a circuit board implies sloppy engineering. The tolerance for photographic interpretation is essentially zero.
Color accuracy is critical with electronics because brands often distinguish products through subtle finish variations. The difference between silver and platinum MacBook finishes might be barely perceptible in person, but it represents distinct product SKUs worth hundreds of dollars in price differences. Get the color wrong, and you've created product confusion that damages brand identity.
Modern electronics also feature active elements like LED indicators, screens, and illuminated controls that must integrate with product lighting. This creates exposure challenges rarely encountered in traditional product work. Electronics demand a precise lighting control that manages reflections while preserving the engineered surfaces that communicate quality and precision.
Electronics typically require everything in sharp focus, from front bezels to rear ports, because customers need to evaluate functional details across the entire device. Because even an inch-small detail in electronics carries its value.
Mastering Reflective Surfaces: Glass, Metal, and Glossy Plastics
Every glossy surface acts like a mirror, capturing your lights, studio walls, ceiling, and all surroundings. Learning to control what these surfaces "see" is the difference between amateur and professional results.
Lighting Strategies for Different MaterialsGlass screens and camera lenses need incredibly smooth light transitions. Any hard edge in your lighting setup creates visible lines across the surface. The solution is making your light sources large relative to the surface area. A 24-inch softbox might seem massive for a smartphone, but that size relationship creates the gradual transitions that make screens look premium. | 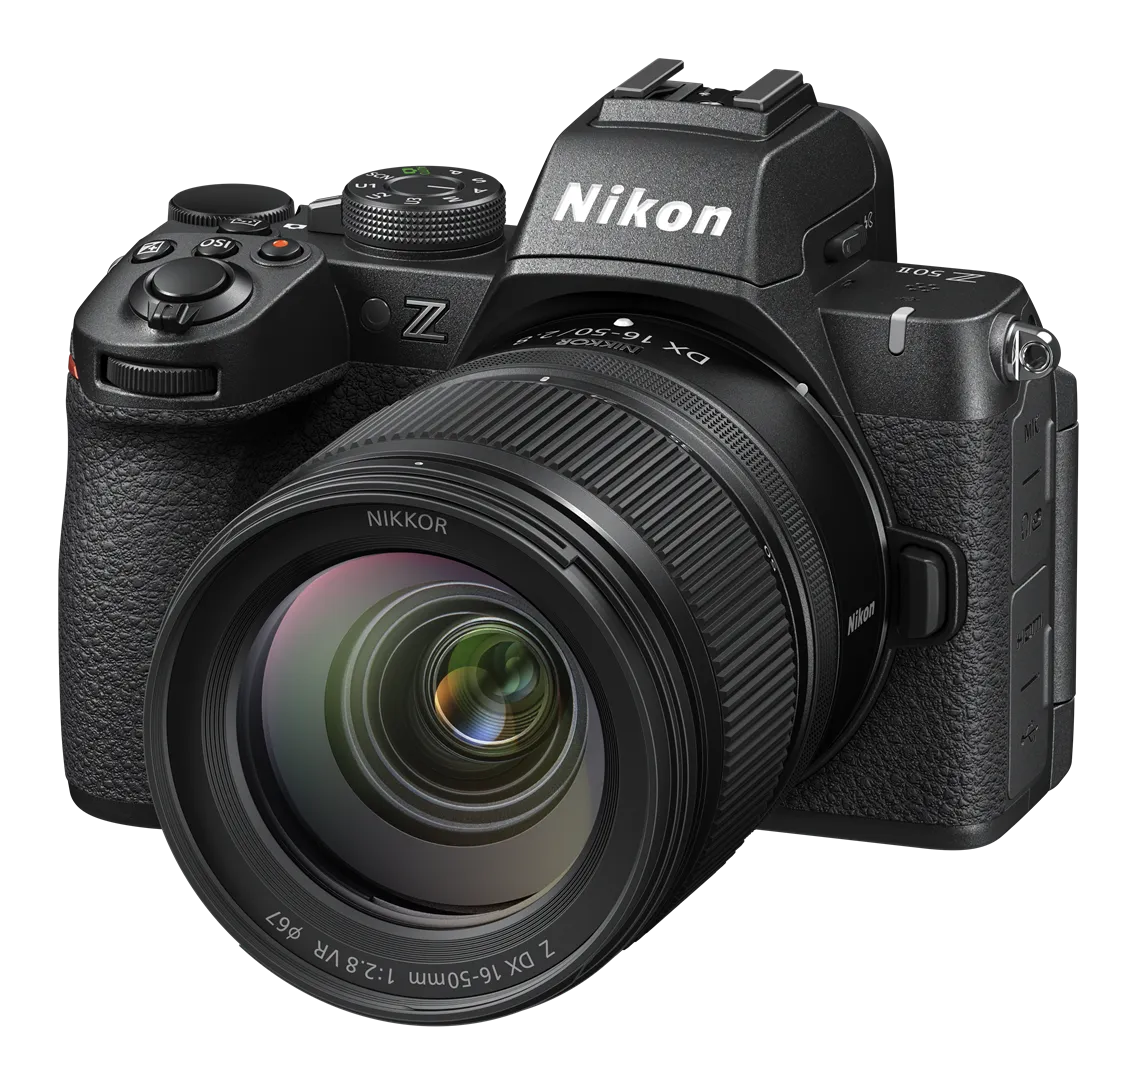 |
 | Brushed aluminum reveals its directional texture only under properly angled light. Light hitting perpendicular to the brush direction disappears into the surface. Light hitting parallel to the brush direction creates harsh streaks. Typically, 30-45 degrees is optimal for the brush direction to reveal texture without creating hotspots. |
| Position white cards, diffusion panels, or gradient materials as the primary elements that these surfaces will show. Think of chrome surfaces as windows into your lighting setup, and make sure they're seeing something attractive. |  |
 | Glossy plastic combines reflective and diffusive properties, requiring lighting that manages reflections while revealing any underlying texture. The surface angle matters enormously. Light hitting at steep angles often disappears into glossy plastic. Shallower angles create more manageable reflections that can be controlled through positioning. |
Multiple light sources working together create the complex lighting signatures associated with premium electronics. A primary light establishes overall form. Fill lights eliminate shadows in ports and recesses. Rim lights define edges without creating unwanted surface reflections. Each light serves a purpose, positioned with mathematical precision relative to your camera angle.
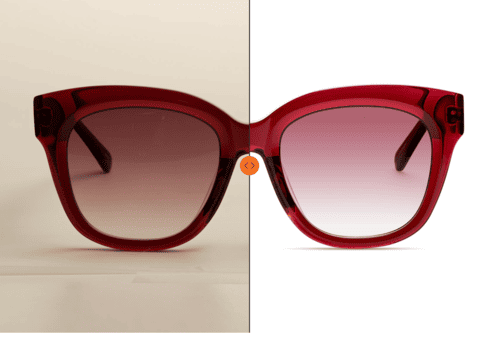
When to Solve Problems in Post Instead of on Set
Some reflection challenges are faster and cleaner to fix during retouching than during capture. Simple reflection management, like using flags to block unwanted elements or polarizers to reduce glare, should always happen during shooting. But complex products with multiple reflective surfaces might require choosing which surfaces to optimize during capture.
Screen reflections often work better as post-production solutions. Rather than fighting to eliminate all reflections during shooting, which makes screens look dead or shooting too extensive, many pros capture natural environmental reflections, then replace or enhance screen content during retouching. This maintains believable surface characteristics while ensuring perfect screen legibility and a smooth production process.
Products requiring multiple viewing angles: showing screen, back, and sides simultaneously, often need impossible camera positions to get a perfect perspective on every surface. Shooting separate exposures for different faces and compositing during retouching delivers results that no single capture position could achieve.
The decision point is the client's timeline and budget. Speed-critical projects need solutions that work during capture. Premium campaigns with flexible timelines often benefit from planned post-production work that delivers impossible-to-capture results.
Screen Product Photography Techniques
Avoiding Moiré and Technical Artifacts
Moiré happens when your camera sensor's pixel pattern interacts with display pixels, creating rainbow interference. Higher resolution cameras and displays make this worse, not better, because both create finer patterns that interact unpredictably.
Prevention starts with small adjustments that often solve the problem completely. Moving a few millimeters closer or farther from the screen can eliminate moiré entirely. Changing your aperture, particularly avoiding middle ranges like f/8, where diffraction worsens the effect, often provides immediate improvement.

Display refresh rates create dark bands or uneven illumination when they don't sync with your shutter speed. Keep reference charts of shutter speeds that work cleanly with common device refresh rates. Generally, slower speeds (1/30th second or longer) avoid timing conflicts with most modern displays.
Longer focal lengths reduce moiré by decreasing the pixel-level detail your camera captures. An 85mm lens often solves moiré problems that persist with 50mm lenses on the same screen. The trade-off is working distance, but the reflection control benefits of longer lenses often justify the extra space requirements.
Professional Screen Compositing Workflow
Screen compositing, replacing display content during post-production, has become standard practice for premium electronics photography. This technique provides perfect control over screen content while maintaining realistic surface characteristics and reflections.
Start by photographing the device with screens both on and off. The "screen off" version provides clean surface detail and environmental reflections that must be preserved. The "screen on" version shows how the display actually illuminates and interacts with your lighting setup.
Perspective matching becomes critical for believable composites. Screen content must be precisely warped to match the device angle and any lens distortion in the main shot. Professional retouchers use reference grid patterns to ensure mathematical accuracy in this alignment process.
Color space management matters because device screens often display different color spaces than cameras capture. Careful profile matching during compositing maintains a realistic appearance.
Retouching tips for realistic screen presentation
Realistic screen presentation requires subtle details. Real screens have complex interactions with environmental lighting. Recreating these characteristics requires understanding both display technology and viewer expectations.
Real displays have bezels, rounded corners, and surface treatments that affect edge light interaction. Simply dropping screen content into a perfect rectangle looks immediately artificial. Professional retouching includes careful edge work, matching specific display characteristics.
Completely clean screens look fake. Too much environmental reflection makes content illegible. The solution involves selective reflection removal, maintaining subtle environmental cues while ensuring key content remains perfectly clear.
This level of screen retouching expertise has become essential for competitive electronics photography. Basic composite work might suffice for simple projects, but premium brands expect screen presentation that's simultaneously perfectly legible and completely believable.
Advanced Lighting Techniques for Premium Results
Gradient lighting creates the smooth transitions that define premium electronics photography. Instead of even illumination, gradients suggest depth and quality. The technique requires precise control over light falloff, creating transitions that guide the eye and emphasize sophistication.
Effective gradients start with understanding light source characteristics. Larger sources create smoother transitions. Distance controls gradient steepness. A softbox positioned close creates gentle gradients; moved farther away, it produces dramatic light falloff. Match gradient steepness to the product's design language—subtle for minimalist devices, dramatic for bold industrial designs.
 | Multiple gradient sources create complex lighting scenarios. A primary horizontal gradient might run across the device while a secondary vertical gradient adds edge dimensionality. The interaction between gradients creates the complex lighting signatures of premium electronics brands. Control tools become essential for gradient precision. Flags, gobos, and graduated scrims allow fine-tuning of gradient edges and transitions. Professional electronics photographers often use custom-cut cards to create gradients that precisely follow product contours, ensuring light transitions enhance rather than fight the industrial design. |
Combining strobe and continuous lighting opens creative possibilities impossible with single light types. Continuous lights excel at showing how surfaces interact with light, making them ideal for setup and fine-tuning. Strobes provide the power and color quality needed for final capture, particularly when shooting at small apertures for maximum sharpness.
| This hybrid approach works well for electronics with illuminated elements. Continuous lights establish ambient illumination and reveal surface characteristics while strobes freeze LED indicators or screen elements for sharp capture. Continuous lights also allow real-time observation of reflection patterns during setup. |  |
Color temperature matching becomes critical when mixing sources. Strobes typically operate at daylight temperatures (5500K-6000K) while continuous LEDs might vary significantly. Professional setups use color-matched continuous lights or color correction gels for consistent color throughout the setup.
Power ratios between continuous and strobe sources require careful balancing. Continuous lights should provide enough illumination for setup without overwhelming strobe contribution. Typically, continuous lights are set 2-3 stops below strobe power, providing setup visibility while allowing strobes to dominate final exposure.
Lens Choice and Perspective Control ABC for Electronics Product Photographers
Distortion in electronics photography creates more than aesthetic issues, as it can make products appear defective or poorly manufactured. Wide-angle lenses might seem convenient for capturing entire devices in tight studio spaces, but barrel distortion curves straight edges and makes precision-engineered products look amateurish.
The 85mm to 135mm range represents the go-to option for most electronic photography. These focal lengths provide sufficient working distance for complex lighting while maintaining natural perspective relationships. Macro versions offer close focusing capabilities essential for detail shots of ports, connectors, and interface elements.
Tilt-shift lenses deserve consideration for electronics photography. Their ability to correct perspective distortion and control depth of field independently makes them invaluable for maintaining straight lines. When photographing devices at slight angles, tilt-shift corrections restore perfect geometry impossible with standard lenses.
Ecommerce photography demands absolute consistency across product variations: different colors, sizes, or configurations of the same device family. Inconsistent perspective, scale, or positioning can make professional product lines appear disorganized and undermine brand credibility.
Focal length standardization forms the foundation of consistent ecommerce photography. Once you've established optimal focal length for a product family, maintain it across all variations. This ensures perspective relationships remain constant, making products appear properly related when viewed together on ecommerce platforms.
Distance relationships become equally critical. Products should maintain consistent scale relationships within categories—all smartphones appearing at similar sizes relative to the frame, all laptops maintaining the same screen-to-bezel proportions. This requires precise camera-to-subject distance measurements and systematic positioning protocols.
Reference templates streamline consistency across long product shoots. Create overlay guides showing exact product placement for different device sizes within the same family. These templates ensure that despite variations in physical dimensions, products maintain consistent visual relationships within the frame.
Post-Production Perspective Corrections
Despite careful lens choice and positioning, some perspective corrections work better during post-production. Complex product arrangements, space limitations, or client requests for impossible angles sometimes make capture-based solutions impractical.
Perspective correction software offers precise control over keystone correction, lens distortion, and perspective matching. However, these corrections work best when planned during capture. Shooting with slightly more space around products provides flexibility for cropping after perspective adjustments.
Quality trade-offs of perspective correction require consideration. Significant corrections can reduce image resolution and sharpness, particularly in corners. For critical applications, it's often better to capture multiple exposures at different angles and composite the best elements rather than rely heavily on perspective correction.
Scaling Your Electronics Photography Business
The complexity of modern electronics photography often exceeds what individual photographers can handle efficiently while maintaining competitive pricing and delivery schedules. But retouching partnerships allow them to take on more ambitious projects while focusing their time on creative and technical work that truly requires their expertise.
Professional photo editing partnerships work best when established as ongoing collaborations rather than project-by-project relationships. Consistent retouchers develop an understanding of your shooting style, client expectations, and brand requirements, allowing them to enhance your work while maintaining your distinctive creative voice.
Workflow integration becomes essential for effective retouching partnerships. Developing standardized file organization, naming conventions, and technical specifications ensures smooth handoffs between shooting and retouching phases. Clear communication about client expectations, deadline requirements, and quality standards prevents misunderstandings that can derail project timelines.
The economic benefits of retouching partnerships extend beyond time savings. Specialized retouchers often work more efficiently on complex tasks than photographers attempting unfamiliar post-production work. This efficiency translates to better project margins and the ability to take on larger, more profitable electronics campaigns.
How does LenFlash elevate your client's deliverables? Our team handles the technical requirements and aesthetic standards that separate professional electronics photography from routine product shots, allowing photographers to focus on the creative and capture work that truly requires their expertise while ensuring every deliverable meets the exacting standards of premium electronics brands.
Focus on what you do best and delegate photo editing to LenFlash!


